
Comment mettre en exposant dans Google Docs
Besoin de saisir des exposants ou des notes de bas de page ? Découvrez comment utiliser la mise en exposant dans Google Docs grâce à des étapes simples, des raccourcis clavier et des conseils sur le menu de mise en forme.
Ce guide fournit une procédure détaillée pour mettre du texte en exposant dans Google Docs.
Suivez ces étapes pour modifier du texte en format exposant sans effort à l'aide du menu Format ou de raccourcis clavier.
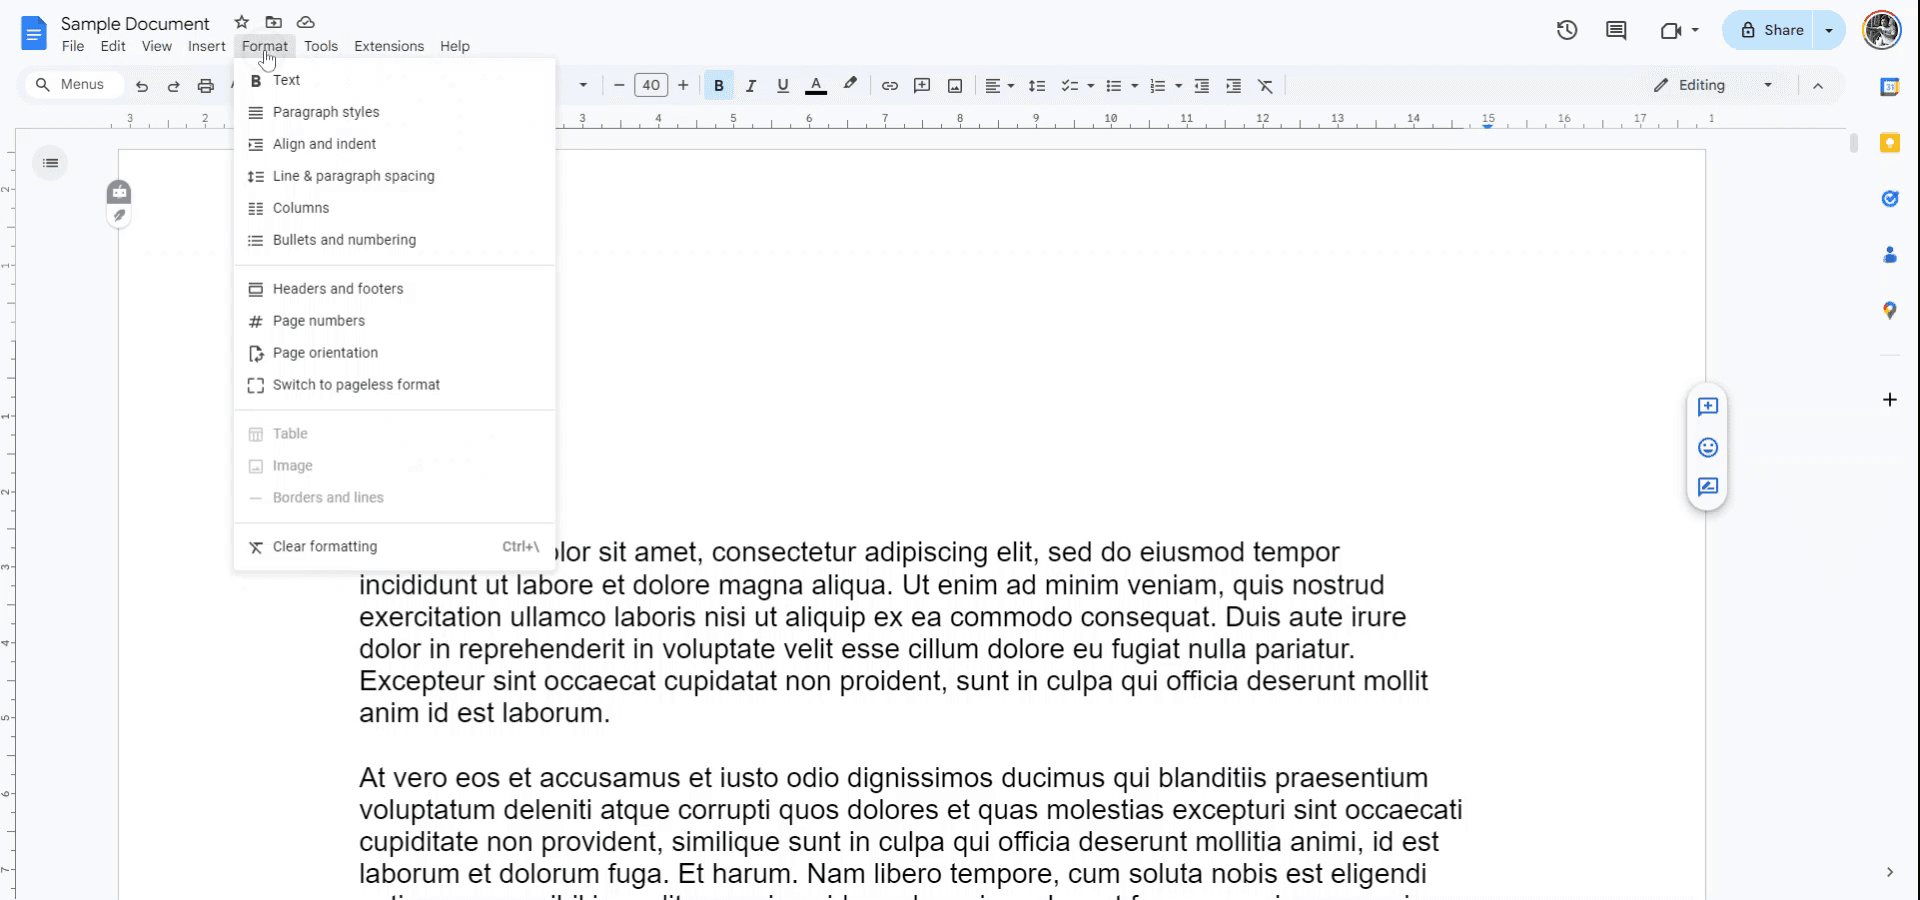
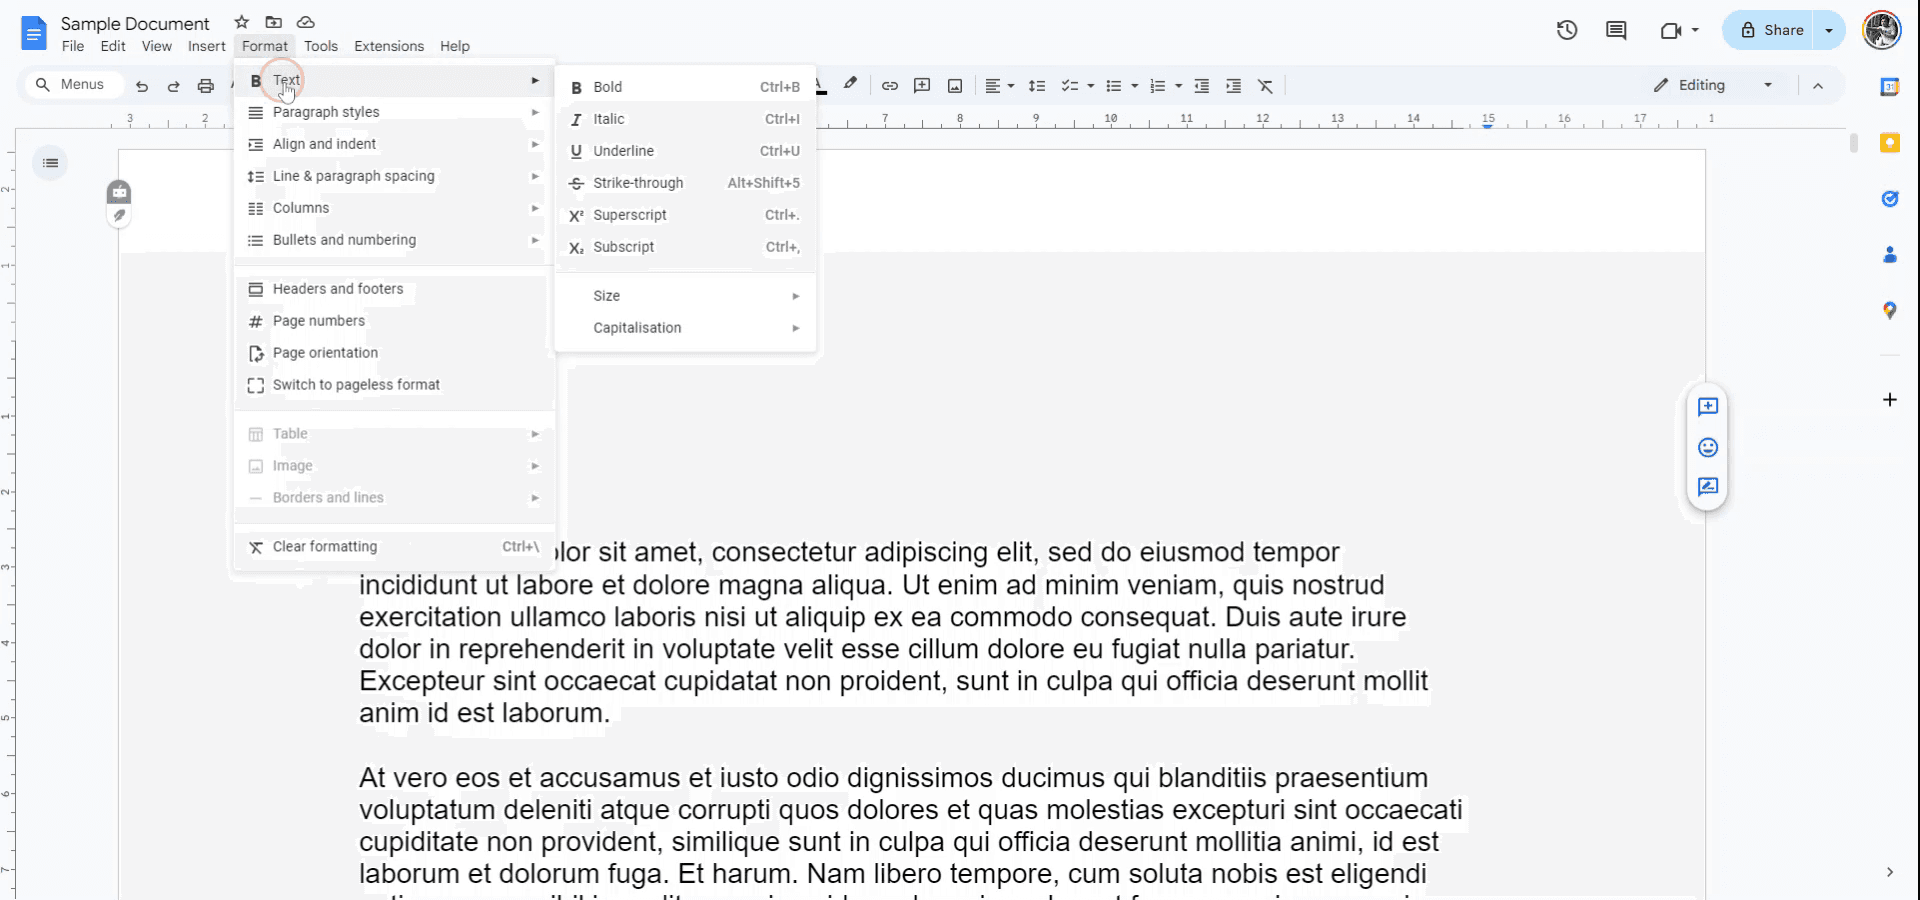
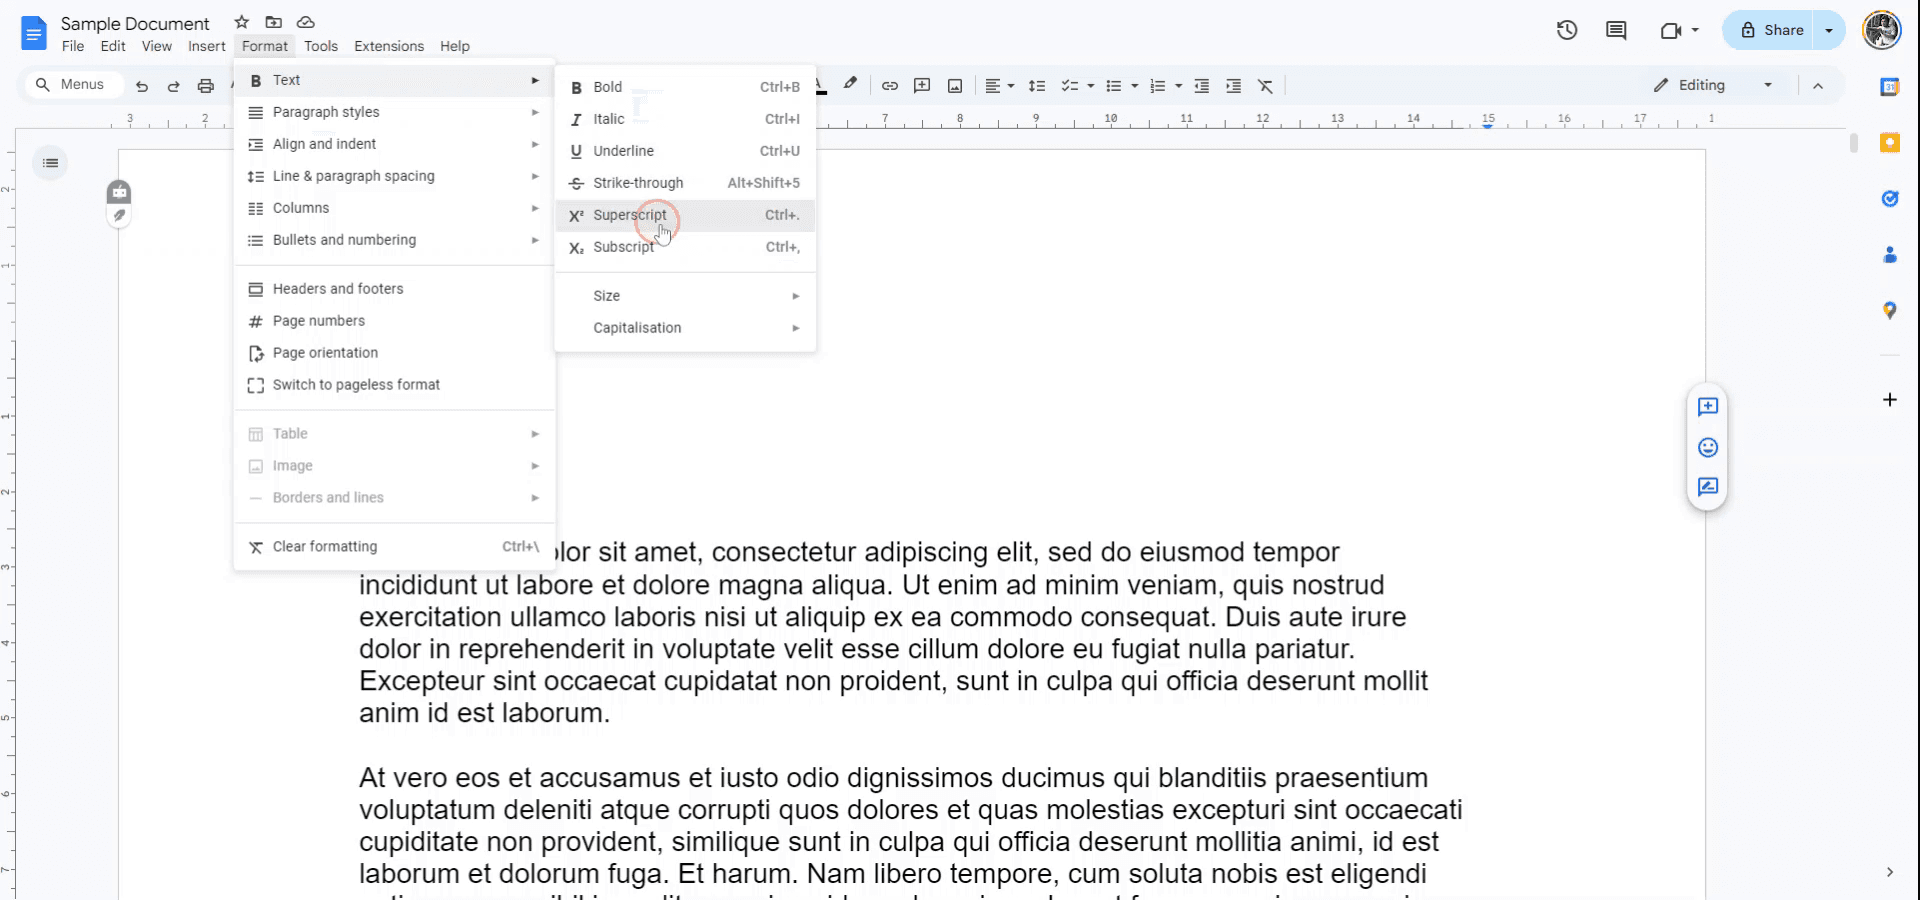
Pour mettre du texte en exposant dans Google Docs, vous pouvez utiliser soit le menu de mise en forme soit un raccourci clavier. Mettez le texte en surbrillance, puis allez à Format > Texte > Exposant ou utilisez le raccourci clavier Ctrl + . (Windows) ou Cmd + . (Mac).
Étapes :
Ouvrez Google Docs : Lancez Google Docs et ouvrez le document que vous souhaitez modifier.
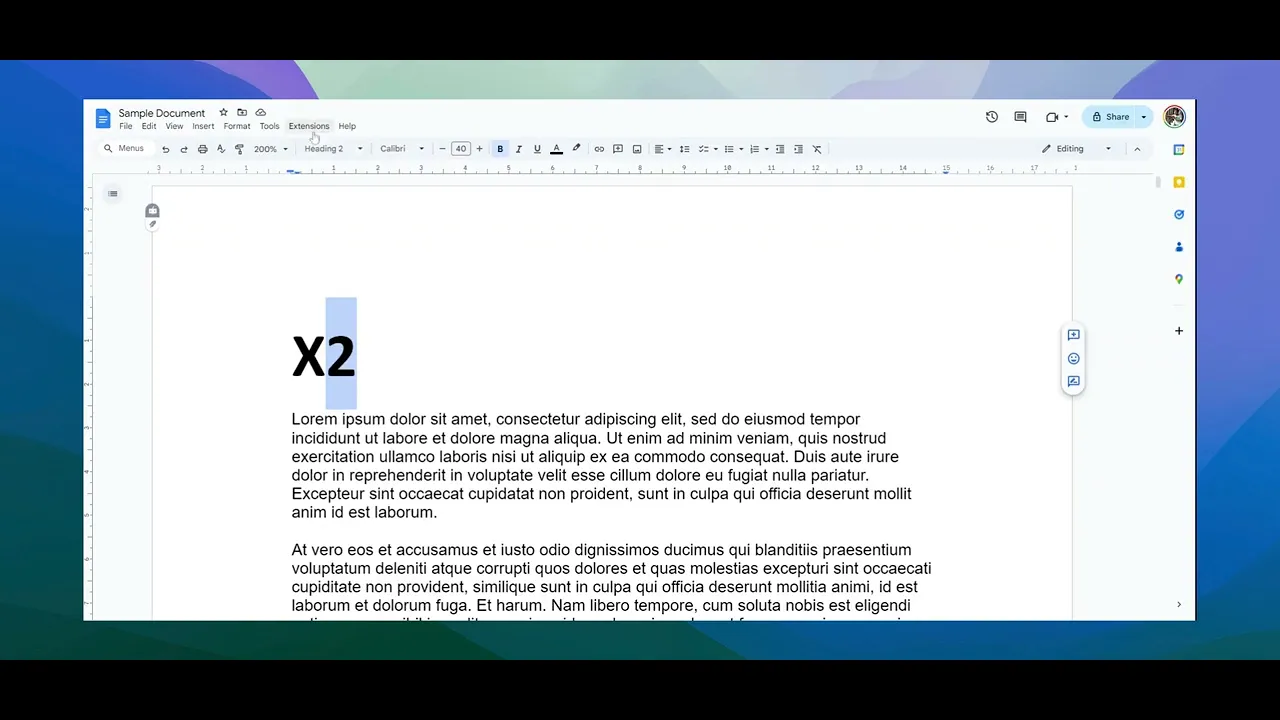
Mettez le texte en surbrillance : Sélectionnez le texte que vous souhaitez convertir en exposant.
Utilisez le menu : Allez à Format > Texte > Exposant.
Utilisez le raccourci clavier : Appuyez sur Ctrl + . (Windows) ou Cmd + . (Mac).
Guide étape par étape : comment mettre du texte en exposant dans Google Docs
Étape 1
Commencez par ouvrir le fichier Google Docs et sélectionner le texte que vous souhaitez mettre en exposant.

Étape 2
Accédez au menu "Format" dans la barre d'outils.
Étape 3
Dans le menu déroulant sous "Texte", choisissez l'option "Exposant".
Étape 4
Sélectionnez le texte que vous souhaitez mettre en exposant. Appuyez sur "Contrôle" et "point" sur votre clavier. Le texte sélectionné apparaîtra alors en exposant.
Conseils pratiques pour réussir la mise en exposant dans Google Docs
Utilisez le menu Format : Sélectionnez le texte que vous souhaitez mettre en exposant, puis allez dans Format > Texte > Exposant pour appliquer rapidement l’effet d’exposant.
Raccourci clavier : Utilisez le raccourci Ctrl + . (Windows) ou Cmd + . (Mac) pour mettre instantanément le texte sélectionné en exposant.
Appliquez l’exposant aux nombres et aux symboles : L’exposant fonctionne bien pour les exposants mathématiques, les symboles mathématiques ou les notes de bas de page ; sélectionnez le texte concerné et appliquez l’option d’exposant.
Insérer des caractères spéciaux : Pour les formules chimiques ou d’autres symboles, allez dans Insertion > Caractères spéciaux et choisissez des nombres ou des lettres en exposant parmi les options.
Combinez avec d’autres effets de texte : Vous pouvez combiner l’exposant avec d’autres mises en forme, comme le gras ou l’italique, pour créer un style distinctif pour votre document.
Pièges courants et comment les éviter lors de la mise en exposant dans Google Docs
La mise en forme disparaît après modification : L’exposant peut revenir au texte normal si le document est fortement modifié ou reformaté.
Correctif : Vérifiez toujours la mise en forme en exposant après avoir effectué des modifications pour vous assurer qu’elle reste appliquée.L’exposant ne s’applique pas au texte complexe : Parfois, l’exposant peut ne pas fonctionner comme prévu pour des combinaisons de plusieurs caractères, comme des équations complexes.
Correctif : Appliquez manuellement l’exposant à chaque partie du texte ou utilisez l’option Insertion > Caractères spéciaux pour des symboles ou des nombres spécifiques.Le raccourci clavier ne fonctionne pas : Le raccourci clavier peut ne pas fonctionner si vous utilisez certains appareils ou certains champs de texte.
Correctif : Utilisez l’option de menu Format > Texte > Exposant si le raccourci clavier ne fonctionne pas.Incohérences d’exposant selon les sections : La mise en forme en exposant peut sembler incohérente si elle n’est pas appliquée de la même manière tout au long du document.
Correctif : Appliquez la mise en forme en exposant de manière cohérente à l’aide du menu Format > Texte pour garantir l’uniformité.Problèmes d’impression du texte en exposant : Le texte en exposant peut apparaître plus petit ou mal aligné à l’impression.
Correctif : Assurez-vous que les paramètres d’impression sont correctement ajustés pour éviter les problèmes de mise en forme lors de l’impression de documents contenant du texte en exposant.
FAQ courantes sur la mise en exposant dans Google Docs
Comment appliquer la mise en exposant dans Google Docs ?
Sélectionnez le texte que vous souhaitez mettre en exposant, puis allez à Format > Texte > Exposant ou utilisez le raccourci clavier Ctrl + . (Windows) ou Cmd + . (Mac).Puis-je mettre plusieurs caractères en exposant dans Google Docs ?
Oui, vous pouvez mettre plusieurs caractères en exposant en les sélectionnant et en appliquant le format exposant.Existe-t-il un raccourci clavier pour la mise en exposant dans Google Docs ?
Oui, utilisez Ctrl + . (Windows) ou Cmd + . (Mac) pour mettre le texte sélectionné en exposant.Comment mettre des symboles ou des nombres en exposant ?
Utilisez Insertion > Caractères spéciaux, et vous pouvez choisir des nombres ou des symboles en exposant pour les équations mathématiques, les formules chimiques, etc.Puis-je combiner la mise en exposant avec d’autres styles de mise en forme comme le gras ou l’italique ?
Oui, vous pouvez appliquer la mise en exposant avec d’autres styles de mise en forme tels que le gras, l’italique ou le soulignement pour un rendu personnalisé.Comment enregistrer l’écran sur Mac
Pour enregistrer l’écran sur un Mac, vous pouvez utiliser Trupeer AI. Il vous permet de capturer l’écran entier et offre des fonctionnalités d’IA telles que l’ajout d’avatars IA, l’ajout d’une voix off, l’ajout de zooms avant et arrière dans la vidéo. Grâce à la fonctionnalité de traduction vidéo par IA de Trupeer, vous pouvez traduire la vidéo dans plus de 30 langues.Comment ajouter un avatar IA à un enregistrement d’écran ?
Pour ajouter un avatar IA à un enregistrement d’écran, vous devrez utiliser un outil d’enregistrement d’écran IA. Trupeer AI est un outil d’enregistrement d’écran IA, qui vous aide à créer des vidéos avec plusieurs avatars, et vous aide également à créer votre propre avatar pour la vidéo.Comment enregistrer l’écran sur Windows ?
Pour enregistrer l’écran sur Windows, vous pouvez utiliser la Game Bar intégrée (Windows + G) ou un outil IA avancé comme Trupeer AI pour des fonctionnalités plus avancées telles que les avatars IA, la voix off, la traduction, etc.Comment ajouter une voix off à une vidéo ?
Pour ajouter une voix off aux vidéos, téléchargez l’extension Chrome Trupeer AI. Une fois inscrit, importez votre vidéo avec voix, choisissez la voix off souhaitée dans Trupeer et exportez votre vidéo modifiée.Comment zoomer dans un enregistrement d’écran ?
Pour zoomer pendant un enregistrement d’écran, utilisez les effets de zoom dans Trupeer AI, qui vous permettent de zoomer avant et arrière à des moments précis, améliorant ainsi l’impact visuel de votre contenu vidéo
Les gens demandent aussi
Générateur de documentation technique
Logiciel de base de connaissances
Comment ajouter un menu déroulant dans Google Docs
Comment ajouter un sous-titre dans Google Docs
Comment taper le symbole TM (™) dans Google Docs
Tutoriels associés

