
Comment modifier l'opacité dans Canva
Apprenez à modifier l’opacité des éléments dans Canva pour créer des effets de transparence. Guide étape par étape pour ajuster la transparence du texte, des images et des formes
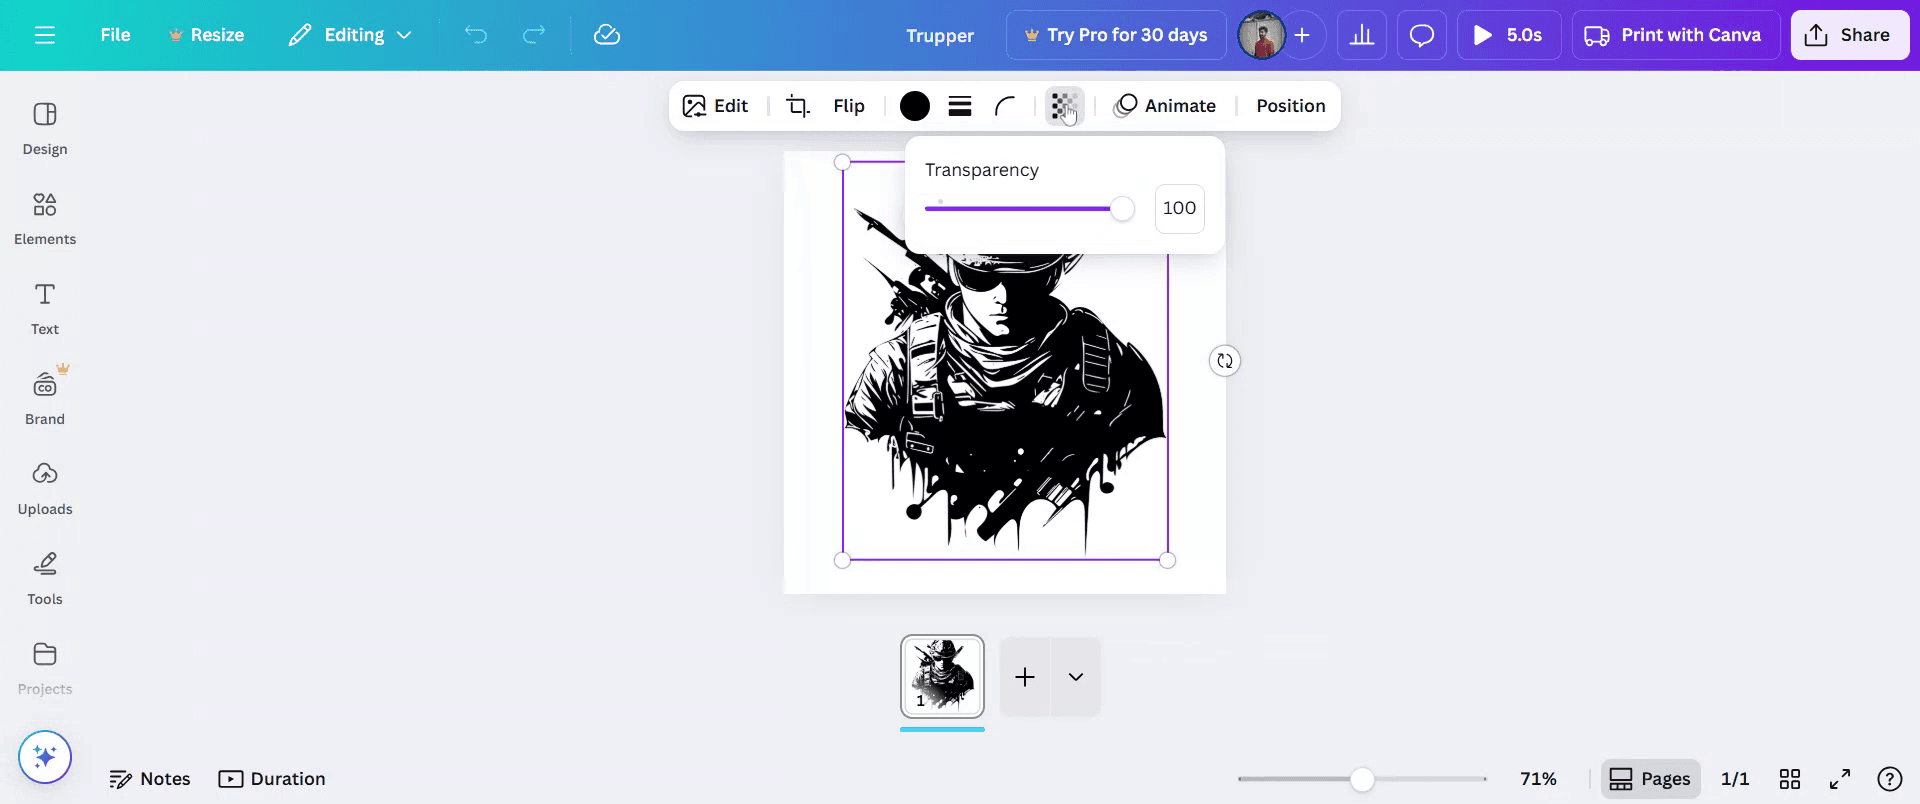
Pour ajuster l'opacité ou la transparence d'un élément dans Canva, sélectionnez l'élément, repérez l'icône de transparence (damier ou carré estompé) et utilisez le curseur pour régler le niveau de transparence. Vous pouvez également saisir une valeur numérique précise (0-100) dans le champ de saisie.
Étapes détaillées :
1. Sélectionnez l'élément : cliquez sur l'image, la zone de texte, la forme ou tout autre élément spécifique de votre design Canva que vous souhaitez rendre transparent.
2. Accédez à l'outil de transparence : repérez l'icône de transparence, qui ressemble à un damier ou à un carré estompé. Cette icône se trouve généralement dans la barre d'outils supérieure de l'éditeur Canva.
3. Ajustez le curseur : une fois sélectionné, un curseur apparaîtra. Faites glisser le curseur vers la gauche pour diminuer l'opacité (rendre l'élément plus transparent) ou vers la droite pour augmenter l'opacité (rendre l'élément moins transparent). Vous pouvez également taper un pourcentage précis (0-100) dans le champ de saisie à côté du curseur.
4. Prévisualisez les modifications : lorsque vous ajustez le curseur, vous verrez la transparence de l'élément se mettre à jour en temps réel sur la zone de travail de votre design.
5. Finalisez votre design : cliquez n'importe où en dehors de l'élément ou de l'objet sélectionné pour le désélectionner et finaliser l'ajustement de l'opacité.
Guide étape par étape : comment modifier l'opacité dans Canva
Étape 1
Commencez par sélectionner un projet existant dans Canva que vous souhaitez modifier.

Étape 2
Ensuite, cliquez sur l'élément spécifique du projet que vous souhaitez modifier.

Étape 3
Cliquez sur l'option 'Transparence' et ajustez le niveau de transparence selon vos préférences.
Étape 4
Une fois que vous êtes satisfait des modifications, cliquez sur 'Partager' pour diffuser votre projet.

Conseils de pro pour modifier l’opacité dans Canva
Ouvrez votre design dans Canva
Connectez-vous à Canva et ouvrez le design dans lequel vous souhaitez ajuster l’opacité d’un élément.Sélectionnez l’élément que vous souhaitez modifier
Cliquez sur l’image, la zone de texte, la forme ou le graphique dont vous souhaitez modifier la transparence.Cliquez sur l’icône d’opacité
Regardez en haut à droite de la barre d’outils et cliquez sur l’icône à damier qui représente la transparence.Ajustez le curseur d’opacité
Utilisez le curseur pour modifier le niveau d’opacité. Faites-le glisser vers la gauche pour diminuer l’opacité et vers la droite pour l’augmenter jusqu’à 100 %.Prévisualisez et peaufinez
Examinez votre design pour voir le rendu de l’opacité ajustée. Apportez d’autres modifications si nécessaire pour trouver le bon équilibre et plus de clarté.
Erreurs courantes et comment les éviter
L’icône d’opacité n’est pas visible
Assurez-vous qu’un élément est sélectionné. L’icône de transparence n’apparaît que lorsqu’un objet modifiable est actif.L’opacité ne s’applique pas à l’arrière-plan
Pour modifier l’opacité de l’arrière-plan, ajoutez une forme ou un calque par-dessus l’arrière-plan et ajustez plutôt sa transparence.Oublier d’ajuster le texte séparément
Si vous modifiez des éléments groupés, souvenez-vous que le texte et les formes peuvent devoir être ajustés un par un.Une opacité faible rend les éléments difficiles à voir
Évitez de régler l’opacité trop bas, surtout pour les éléments clés comme le texte ou les logos, afin de conserver la lisibilité.L’opacité ne se conserve pas dans les téléchargements
Les effets de transparence peuvent apparaître différemment aux formats PDF ou JPG. Utilisez PNG pour de meilleurs résultats lors du téléchargement de designs avec opacité.
FAQ courantes sur la modification de l’opacité dans Canva
Comment puis-je régler l’opacité d’un élément dans Canva
Sélectionnez l’élément, cliquez sur l’icône de transparence dans la barre d’outils, puis faites glisser le curseur jusqu’au niveau souhaité.Puis-je modifier l’opacité de plusieurs éléments à la fois
Oui, vous pouvez sélectionner plusieurs éléments et ajuster leur transparence en même temps.L’opacité fonctionne-t-elle sur le texte et les images
Oui, vous pouvez modifier l’opacité du texte, des images, des formes et d’autres éléments de conception.Puis-je définir un pourcentage d’opacité personnalisé
Oui, vous pouvez utiliser le curseur ou saisir manuellement une valeur de 0 à 100 pour un contrôle précis.L’opacité est-elle disponible dans la version gratuite de Canva
Oui, les contrôles d’opacité sont disponibles pour les utilisateurs gratuits comme pour les utilisateurs Pro.Comment enregistrer l’écran sur Mac
Pour enregistrer l’écran sur un Mac, vous pouvez utiliser Trupeer AI. Il vous permet de capturer l’intégralité de l’écran et offre des fonctionnalités d’IA telles que l’ajout d’avatars IA, l’ajout de voix off, ainsi que le zoom avant et arrière dans la vidéo. Grâce à la fonctionnalité de traduction vidéo par IA de Trupeer, vous pouvez traduire la vidéo en plus de 30 langues.Comment ajouter un avatar IA à un enregistrement d’écran ?
Pour ajouter un avatar IA à un enregistrement d’écran, vous devrez utiliser un outil d’enregistrement d’écran IA. Trupeer AI est un outil d’enregistrement d’écran IA, qui vous aide à créer des vidéos avec plusieurs avatars et vous aide également à créer votre propre avatar pour la vidéo.Comment enregistrer l’écran sur Windows ?
Pour enregistrer l’écran sous Windows, vous pouvez utiliser la barre de jeu intégrée (Windows + G) ou un outil d’IA avancé comme Trupeer AI pour des fonctionnalités plus avancées telles que les avatars IA, la voix off, la traduction, etc.Comment ajouter une voix off à une vidéo ?
Pour ajouter une voix off aux vidéos, téléchargez l’extension Chrome Trupeer AI. Une fois inscrit, téléchargez votre vidéo avec le son, choisissez la voix off souhaitée depuis Trupeer, puis exportez votre vidéo modifiée.Comment faire un zoom avant sur un enregistrement d’écran ?
Pour zoomer pendant un enregistrement d’écran, utilisez les effets de zoom dans Trupeer AI, qui vous permettent de zoomer avant et arrière à des moments précis, améliorant ainsi l’impact visuel de votre contenu vidéo.
Lectures suggérées
Générateur de documentation technique
Logiciel de base de connaissances
Comment créer un journal dans Canva
Comment imprimer en recto verso dans Canva
Comment étirer du texte dans Canva
Comment télécharger plusieurs fichiers à la fois depuis Canva
Tutoriels associés

